I think that a very easy way to get started with the LPC1347 is to buy an LPCXpresso board for about $30. This comes with a development board and in circuit emulator and is supported with an Eclipse IDE that runs on Linux or Windows. Finally it is fairly easy to use. In fact I have installed both the LPC1769 and LPC1343 boards for my own testing. That said; once you start developing your own hardware for different processors it gets expensive buying new development kits for every new chip. Furthermore there really is no need to do that. If you don’t buy the LPCXpresso board you don’t get a license for the CodeRed toolchain and IDE. This is unfortunate since the tools for the most part are open source and derived from the GCC and Eclipse projects. To overcome this limitation I will show you how to install a free set of GCC compiler tools that don’t require you to buy anything. What I will describe is an open source ARM set-up for the LPC134x using GCC and Programmers Notepad.
Installing GCC for ARM
- Install CodeSourcery g++ Lite for ARM. The latest code is available from CodeSourcery at https://sourcery.mentor.com/sgpp/lite/arm/portal/subscription?@template=lite
- Click the install option that does not include an IDE as this will be provided by programmers notepad.
- Create a folder named c:/DNC_LABS and unzip the following folder into it. DNC_LABS
- Install Programmers Notepad from http://www.pnotepad.org/download/
- Open Programmers Notepad
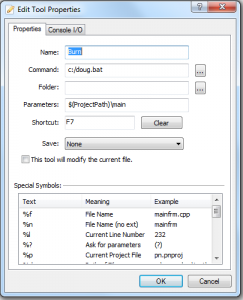
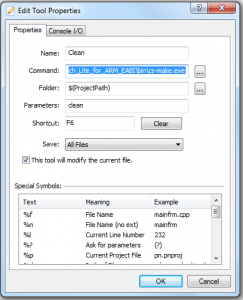
- Goto “Tools->Options->Tools->Project Tools” click “Add” three times and fill out the dialog boxes as shown.
Installing Programmers Notepad

Testing the Compiler and IDE
At this point you have built the build environment and a programming IDE so it’s time to test compiling some code. The first project ‘Blink’ is the embedded equivalent of Hello World except we blink a LED to exercise the hardware.
- Create a project folder called “Blink”
- Copy the “c:/DNC_LABS/makefile” to the “Blink” folder
- Open Programmers Notepad
- Click “File->New->Project” and create a project named “Blink” in the directory you just created.
- Open a new “File->New->C/C++” file in Programmers Notepad and save it as “main.c” in the “Blink” directory
- Right click the “Blink” project icon in the Projects frame of Programmers Notepad and then select “Add files” selecting the “main.c” file you just created.
- Copy the following code to “main.c” and save
//Blink
#include "LPC13xx.h"

// Function to provide short delay
void short_delay(int n)
{
	volatile int d;
	for (d=0; dDIR |= 1<<7;				//P0.7 is an output

	// Enter an infinite loop, cycling through led flash sequence
	while(1) {
		gpioSetValue (0, 7, 1);			//P0.7 On
		short_delay(1000);
		gpioSetValue (0, 7, 0);			//P0.7 Off
		short_delay(2000);
	}
}
- Press F5 to compile the code.
- Press and hold the reset button for 1 second.
- Press F7 to download the code to the LPC1347.
- Press the reset button briefly and the LED should start to blink as your new code runs.
That was easy but the code is still to complex. The above example does not make use of the libraries I am planning. Instead it uses the raw chip interface defined specifically for this chip by the vendor. Stay tuned because I think you'll see the advantage of libraries in my next post.